
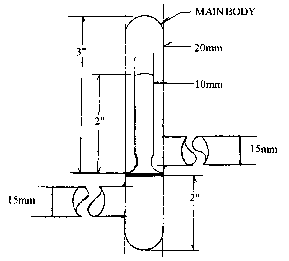
Here are some drawings and instructions for making a debris trap. I have mine attached to the manifold with large vacuum tubing to facilitate easy removal for cleaning. Materials list for one manifold trap:
2x 12"-15" x 20mm clear glass
1x 12"-15" x10mm clear glass
1x 12"-15" x15mm clear glass
2-3 corks each size for tubes
In this first diagram you see one piece of 20mm gathered and drawn. You can heat the tube at the halfway mark. In gathering you want to double or quadruple the wall thickness – to get the gather so thick you heat no more that a 20mm length. (Double-wall will waste less glass – the more you gather the longer the pull will be). Keeping the glass still, with no horizontal movement (except for rotating), you will soon have the 20mm of hot glass. When you are ready to draw continue rotating the glass and wait a few seconds for the intense heat to leave the glass. Drawing the tube too soon will result in a thin glass wall. The end result you want is for the wall thickness to be at least that of the 10mm tube. Also keep an eye out for the drawn glass to close itself – you want to avoid that.
Do the same with two pieces of 15mm glass, drawing to 5mm - 8mm. Set aside.

Once you have this "stemmed*' piece of 20mm glass, locate where the drawn section is 10mm, plus or minus 2mm. Cut the drawn tube there and splice a piece of 10mm. If the drawn glass is thicker on the 20mm side concentrate the flame at that point – the idea here is to form a shoulder. If the drawn glass lacks the thickness then simply gather the 10mm tube at the splice and blow it out to form the shoulder. You'll need the 10mm tube to be a little thicker at the splice for the next step.

Here you see that a little neck is drawn into the 10mm tube – this is not a necessary step but will help in the following procedure. Be sure not to create a neck too little – down to 8mm at the smallest. Cut the 10mm to length 2" before proceeding.

In this drawing you see that the second:second piece of 20mm is joined to the glasswork which you just completed. You need a clean cut on the second piece of 20mm to make a good splice. The importance of the shoulder and 20mm mating properly should be considered the most important step. Because this s splice forms a solid separating seal it must be of equal thickness around its entire circumference.
Press the two pieces being spliced together before entering the crossfire. Heat the touching glass, pushing them together to form a thick seal – before blowing – allow to cool slightly – keeping the wall thick.
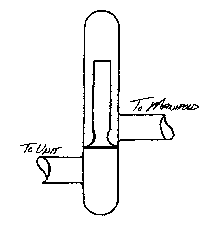
The last two steps are identical but should he done in proper order. On the opposite side of the internal 10mm stem you will tubulate the 20mm so you can splice the 15mm unit arm to the body of the trap. The tubulation hole should match the diameter of the 15mm you pulled earlier. Proceed to splice the 15mm arm to the main body using the thicker drawn glass to expand to 15mm. Once you've finished this splice, anneal the opposite side and quickly do the same to the upper part of the main body. It is important not to pause at all during these last two splices. Don't forget to pull the 20mm closed after splicing 15mm arms! Anneal the entire piece with a "fluffy" flame and allow to cool in a flower pot full of vermiculite. (This will allow the piece to cool slowly- about 45 minutes to room temperature.)
Two last notes:
On unit and manifold arms, it is much easier to splice the smaller diameter drawn 15mm and use the thick wall to be the medium of the splice – If you blew a 15mm hole and tried to splice you're in rougher water. Mastering the gathering-and-drawing is a much more helpful skill.
Purchase vermiculite from a garden supply store. It can be preheated to allow even slower cooling (90 to 120 minutes). I've made thirty pieces and checked them for stress with polarizing sheets – they are all okay.
( Editor's note: If you 're too lazy or busy to make your own, Ed also sells these – see his ad below. )
Shadowmaker Neon(201-694-2585, fax 201-694-2768) is selling
silicone rubber stoppers for glassblowing – better than rubber or
cork, with a 500'F temperature resistance for those finger-burning
bends. They are also very tear-resistant, yielding fewer bits and
pieces in blown tubes. A $9 sample pack!c contains (3) 8, 9, 10mm; (3)
11, 12, 13mm;(2) 15mm,(2)18 and 20mm. Price includes
first-class mail (continental only) shipping. Also, a minimum order of 15 corks mixed and matched can be purchased for:
8-9-10mm: $ .30 eachEd's also hawking debris traps (see article; $19.50 each plus shipping/postage) and metal window frames for neon signs, with a 3" return on window bumpers; vinyl protection caps for the window, optional tube supports welding directly to 12ga steel 6'ame; unfinished or painted black or gray, 6' hanging chain included. Fax a pattern for a quote; shipped UPS.
11-12-13mm: $ .65 each
15mm: $1.10 each
18 and 20mm: $1.40 each
Copyright 1995 THE NEON NEWS
Published by Ted Persig & Val Crawford
Email: crawford@hawaii.net